by kalle | Mar 13, 2021 | Foto, Hacking, Hardware projects
Last summer I got a Xiaomi XiaoFang 1S camera from Magnus. Tried to get it working then but never succeeded but today I got some inspiration and managed to get it working and stream video over RTSP! It was not so hard. Just go to the GitHub project Xiaomi-Dafang-Hacks and follow the instructions but one must know that it was a T20L so start with those specific instructions.
One thing also that might have made a difference, now this time I did this on my Windows machine and not my Mac. And really made sure the SD card was formatted as a FAT32 drive.
Also found this firmware that looks interesting; OpenMiko
by kalle | Jan 20, 2019 | Server
I had a bit of struggle with Let’s Encrypts certbot today. Somehow it got 403 Forbidden each time it tried to authenticate the domain for my server. All the other website it worked without problem.
I created a simple text file in /.well-known/acme-challenge to see if I could access it. Yes it worked externally but then I realized I got 403 Forbidden when I tried to access from the server!
After lots of digging and testing I checked the apache general error.log and saw these lines:
[Sun Jan 20 21:52:32.754574 2019] [authz_core:error] [pid 2238] [client 2001:4b98:dc2:47:216:3eff:fe9b:cec6] AH01630: client denied by server configuration: /var/www/
Seeing that IPv6 address gave a clue and soon I found out it was due to that my webserver is not setup to listen to IPv6.
<virtualhost 185.26.124.99:80 [2001:4b98:dc2:47:216:3eff:fe9b:cec6]:80>
Adding it to the Virtual host listen config it solved it!
by kalle | May 29, 2018 | Hacking, Technology in general
Lånade hem en Amazon Echo för att experimentera lite vad man kan göra med den och se hur bra röstgränssnittet är. Någon hade nämnt man kan använda den för att spela musik från Spotify och hittade rätt fort var man skulle ställa in det men valet var utgråat!! Gick inte välja. Varför?
Efter lite googlande hittade jag att det beror på att ens Amazon konto är registrerat i fel region. Men hur ändrar jag och vad är rätt?
Den här artikeln gav tillräckliga ledtrådar för att inse var man ändrar det. Dock enklast är att först lägga in en ny USA adress(det är den region som du måste valt för att få upp Spotify valet visade det sig). Men vilken adress skall man fylla i? Random addresses ger ett par slumpmässiga men dessa ville inte Amazon acceptera. Jag tog dock ett av resultaten och klippte in i Google Maps och sedan klicka på en annan del av gatan för att få en giltig adress.
Sedan nästa steg var att göra som beskrivs i artikeln, klicka där det står Hello, Karl-Petter(ditt namn) och sedan välja Your Content and Devices. I artikeln står det att den heter Manage your Content and Devices men den heter Your Content and Devices numera. Sedan är det bara följa instruktionerna och välja din nya USA adress. Sedan får du vänta ett tag innan din Echo har fattat att du bytt region. Sedan är det bara följa denna guide.
by kalle | Nov 10, 2017 | Rails, Server, Software, Software development
Suppose you made a brew upgrade and postgres got upgraded. Follow then these steps to upgrade your old DB data to the new version.
Start to move of your old data directory:
mv /usr/local/var/postgres /usr/local/var/postgres_96_20171110
Initialize a new fresh DB with the new version of postgres
initdb /usr/local/var/postgres/
Check which postgres services are running and stop all
brew services list
Stop all postgres services, one command for each:
brew services start postgresql
Run postgres upgrade tool(-b and -B are the bin directories for old and new version, and -d and -D same for data directories):
pg_upgrade -b /usr/local/Cellar/postgresql\@9.6/9.6.6/bin/ -B /usr/local/Cellar/postgresql/10.1/bin/ -d /usr/local/var/postgres_20171110 -D /usr/local/var/postgres
Start the postgres service again:
brew services start postgresql
by kalle | Aug 31, 2017 | Hacking, Software development
I had to spend some time to get my PhpStorm working with debugging a Magento 2 store we are developing. This is a short notice of what I found out and how I got it working.
A couple of weeks ago I had a working setup where I could debug both command line commands and pages using PhpStorm. Last weeks I have been developing a command line but swapped back to some page coding now and it did not work. In my initial setup I mainly followed this setup but since I use MAMP(none PRO) this article was helpful.
After a bit of struggling I found out the reason why it was not working any longer. Because of some mysterious reason I had checked the “Use path mappings…” check box. DON’T!
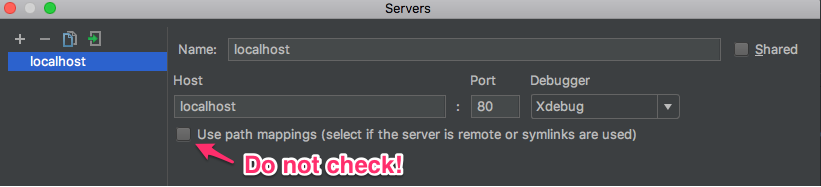
And as you see above it works just fine with using localhost in the servers configuration.
Another useful things to solve this was to add xdebug.remote_log="/tmp/xdebug.log" to the two php.ini files and restart MAMP and then look at the log with tail -f /tmp/xdebug.log. I noticed I had a couple of lines like this:
I: Connecting to configured address/port: localhost:9000.

W: Creating socket for 'localhost:9000', poll success, but error: Operation now in progress (19).

W: Creating socket for 'localhost:9000', poll success, but error: Operation now in progress (19).

I: Connected to client. :-)
The lines starting with W(guess meaning Warning) should not be there. It means the connection was not completely successful even though reading the line indicates some sort of success but there is the error too.
And while we are at it. I have not yet figured out the meaning of this button.
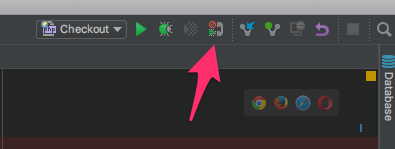
There seems to be no need to listen for PHP debug connections using this setup.
by kalle | Aug 22, 2017 | Hacking, Hardware projects, Raspberry Pi
To setup my Raspberry Pi Z W I have combined two different guides since editing the files on the SD did not work, nor did I had the energy to setup Vagrant.
Start by flashing a micro SD card as described here using Etcher.
Insert the card into a Mac or PC and add enable_uart=1 to the end of config.txt as described here.
Insert the SD card in the Raspberry Pi and boot it as described here using a USB serial cable. Then in a terminal window run screen /dev/tty.usbserial-A7005Gpd 115200 (change to your device tty) to connect to the serial terminal on the Raspberry Pi.
Now you can follow this guide from step 3. Though I did not configure mine for two networks and here are how my configuration files look like:
sudo nano /etc/wpa_supplicant/wpa_supplicant.conf
country=SE

ctrl_interface=DIR=/var/run/wpa_supplicant GROUP=netdev

update_config=1
network={
ssid="SSID_OF_NETWORK_1"
psk="password"
id_str="home"
}
sudo nano /etc/network/interfaces
source-directory /etc/network/interfaces.d
auto lo
iface lo inet loopback
iface eth0 inet manual
allow-hotplug wlan0
iface wlan0 inet manual
wpa-roam /etc/wpa_supplicant/wpa_supplicant.conf
iface home inet dhcp
