Fick ju lite problem med skrivaren på grund av felaktiga inställningar och var lite fundersam till hur plockar man isär den och sedan sätter ihop den för att få bort plast som fastnat. Som tur är har andra redan gjort det och det fanns bra filmer på YouTube. Denna tyckte jag var bäst.
En sak som är viktig vad gäller PrimaCreator skrivaren är att den säljs under flera olika namn och det vanligaste verkar vara MonoPrice Select Mini och söker man på det hittar man tex denna utmärkta Wiki med gott om kunskap om skrivaren och instruktioner.
För ca en månad sedan dök det upp en post i 3D Sweden om en 3D skrivare som kostade relativt lite och verkade vara av bra kvalité, PrimaCreator P120. Så jag slog till och beställde en.
Så här om helgen var det dags att testa den rejält men stötte på problem. Det gick bra med t.ex. den katt söm följde med en fil för på minneskortet men så fort jag slicade själv så gick det åt skogen. Testade en hel del men sedan i ren desperation postade jag i 3D Sweden och fick rätt snabbt svar! Tack Niklas! Det visade sig vara först och främst Retraction Distance som var fel. När jag ställde in det på 3.15mm så fungerade det perfekt.
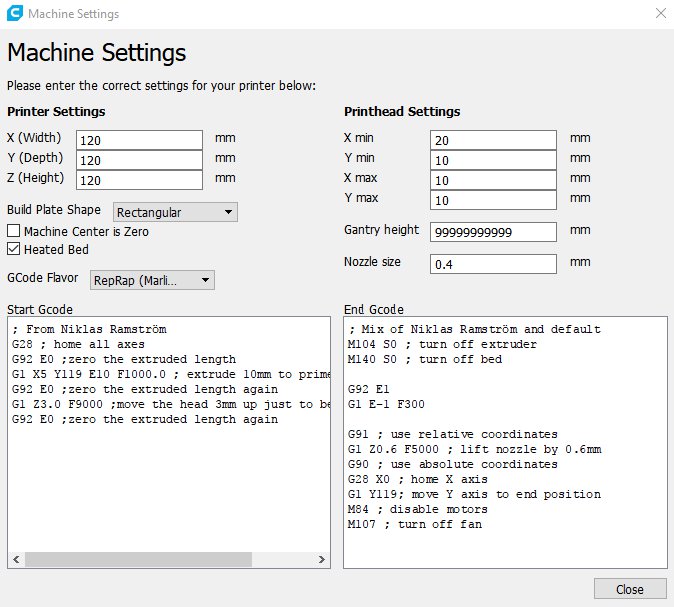
Och här är en bild på skrivarinställningarna och start och slut kod.
Start kod: ; From Niklas Ramström
G28 ; home all axes
G92 E0 ;zero the extruded length
G1 X5 Y119 E10 F1000.0 ; extrude 10mm to prime the nozzle
G92 E0 ;zero the extruded length again
G1 Z3.0 F9000 ;move the head 3mm up just to be safe
G92 E0 ;zero the extruded length again
Slut kod: ; Mix of Niklas Ramström and default
M104 S0 ; turn off extruder
M140 S0 ; turn off bed
G92 E1
G1 E-1 F300
G91 ; use relative coordinates
G1 Z0.6 F5000 ; lift nozzle by 0.6mm
G90 ; use absolute coordinates
G28 X0 ; home X axis
G1 Y119; move Y axis to end position
M84 ; disable motors
M107 ; turn off fan
It was quite some time ago since I last designed a circuit board and had forgotten a bit of how Eagle works. Though the “Using Eagle board layout” tutorial from Sparkfun was a great start so just wanted to share that.
In part I I described how to create the Rails application but now lets focus on the Arduino. First you need to find a library for you GSM/GPRS shield you are using. I have the Seeedstudio GPRS Shield even though I do not have version 2.0 no good library existed for it. The libraries Seeedstudio list on their wiki and product pages all work great but they have which I consider a major flaw; they do NOT use the same methods etc as the official Arduino GSM library does. Thus if someone has developed a client using that shield you would need to re-write the code if you have another GSM shield. Both provide same functionality but through a different API. NOT a good solution in my eyes.
The official GSM library is written to be extended with support for other shields and I started to look into it. After examining the code for a while I noticed it is not written very well. The library as such is large and uses a lot of unnecessary RAM. My intentions is to create a client that will be RAM efficient to run on a Duemilanove which has only 2 kb RAM. Thus I started to write yet another GSM library for the Seeedstudio Shield. The result is the GSMGPRS_Shield library.
Anyway that was a sidetrack from the main, to create a reasonably secure Arduino client. Now we got a library to send and receive information to a HTTP server! So the next step is to find a good REST client. I found a number of different libraries that could be used either just for HTTP communication or both HTTP and REST.
HttpClient which is mainly developed for the Spark and not the best on a vanilla Arduino. Then there is the HTTPClient by Interactive Matter. Yet another HttpClient by Adrian McEwen. And uHTTP though all of these are based on the EthernetClient class and thus has to be re-written if going to be used with any GSM library. So much for code reusability.
There also exists a number of REST client libraries, like spark-restclient which is of course developed for the Spark. Another one is arduino-restclient but again both are built on the EthernetClient class.
After a bit of investigation I decided to use arduino-restclient but modify it to work with my GSMGPRS_Shield library. My fork is available here. My modified version uses the F() macro to put almost all strings into PROGMEM to save ram and cleaned up some other parts as well.
Next I needed MD5, SHA-1 and Base64 encoding since those are used in a request that is going to be received by API_Auth that we used on the rails side. MD5 support is provided by ArduinoMD5. Adafruit has created a stripped down SHA-1 library that I use. For Base64 encoding I used arduino-base64 but created a fork of it since it stored it’s whole Base64 alphabet in RAM instead of PROGMEM.
Then finally it was more or less just to set all this together and create the client. I have put the Arduino sketch on Github, ArduinoAuthenticatedClient.
A quick walkthrough of the code:
Change the secret key to the one generated by your rails application and make sure you set the ID in authHeaderStr to the correct id. In my example the id is 3. The numbers after the id and the : is where the authentication string will be copied.
In general the code is a quite straight forward HTTP/REST client. The interesting part is the getHMACSignature_P function that concatenates the four different strings that are used to create the signature. But first we create the MD5 hash of the requests body and Base64 encode that:
I use my web server here at YellowOrb as host because I needed some public machine. I setup up an SSH tunnel from that to my local machine which runs the Rails application.
The time stamp of the request is important since the receiving Rails application will not accept the request if it is to old. Thus, change the char *dateStr ="Date: Thu, 13 Nov 2014 14:18:11 GMT"; to something appropriate.
Arduinos get more and more connected and I use an Arduino together with a GSM/GPRS shield to build the wind stations.
But the Arduino is a very limited platform and some (as the Nano) has as little as 1k RAM! Then it becomes a real challenge to do web and HTTP communication. Here I will summarise the experience gathered during the construction of a tiny secure REST client for the Arduino.
Why REST?
Ruby on Rails is the framework I prefer when it comes to write web applications. It is powerful still quite fast to work with. Rails uses REST a lot and it is definite the easiest way to considering the server-side. Though HTML is quite talkative so lots of strings(which take RAM) will be needed in the Arduino, or clever use of PROGMEM with which we can put the strings in ROM.
Secure?
What I mainly want to achieve is to make it hard for someone to send/post false information into the Rails application. For the wind stations it does not matter so much but say we use an Arduino for some kind of real world game. Then some clever hacker could quite easily figure out the URL to make a post and then just start posting in actions or whatever the Arduino controls. So we want to make sure those post requests we receive comes from a unit we have put the software inside.
HMAC
But what kind of authentication should one use? Have read around a bit and regarding REST so seems HMAC(Hash based Message AuthentiCation) a good option and recommended(http://restcookbook.com/Basics/loggingin/). Also found an Arduino lib that supports HMAC called Cryptosuite. It seems at first glance to be really memory efficient (uses PROGMEM) but when reading through the code it seems to use about 196 bytes of RAM which is still quite a lot in these circumstances.
Rails application
Lets start with the Rails application. API_AUTH seems to be a good library to get HMAC support for Rails applications so that was my choice.
Create a new Rails project:
>rail new ArduinoAuthenticatedClientExample
Then using you favourite text editor add API_AUTH to the Gemfile:
gem 'api-auth'
After that do a bundle update to get all gems installed.
> bundle update
Our model is quite simple, we have probes(an Arduino) that can post temperature readings(Measures). So lets create these two:
Add the following code to app/controllers/measures_controller.rb so that all REST calls that modify the model needs to be authenticated using HMAC:
# require any kind of change and creation of a measure to come through our authenticated api using HMAC
  # and we skip the CSRF check for these requests
  before_action :require_authenticated_api, only: [:edit, :update, :destroy, :create]
  skip_before_action :verify_authenticity_token, only: [:edit, :update, :destroy, :create]

  def require_authenticated_api
    @current_probe = Probe.find_by_id(ApiAuth.access_id(request))
    logger.info request.raw_post # needed due to a bug in api_auth
    # if a probe could not be found via the access id or the one found did not authenticate with the data in the request
    # fail the call
    if @current_probe.nil? || !ApiAuth.authentic?(request, @current_probe.secret)
      flash[:error] = "Authentication required"
      redirect_to measures_url, :status => :unauthorized
    end
  end
We added a flash error message in the code above so we need to add support in app/views/layouts/application.html-erb to get that presented:
< % flash.each do |name, msg| -%>
      < %= content_tag :div, msg, class: name %>
    < % end -%>
We want the secret keys generated automatically rather then entered by the user. So in app/controllers/probes_controller.rb, in the create method change so the first lines looks like this:
And we want to remove the input field. Change in app/views/probes/_form.html.erb so
< %= f.text_field :secret %>
becomes
< %= @probe.secret %>
Now we are almost done but we want to add some more security. We do not want anyone be able to change the secret keys and actually we would like to add user authentication so that like an admin is the only one who ca see the secrets but that is not a task for this tutorial. If you need that see for example the Devise getting started guide. Add the following to app/models/probe.rb so that the secret only can be read and not modified:
attr_readonly :secret
Now you can run the server and start creating probes. Do
Developing the software for the wind stations I often run into problems and random restarts of the Arduino. Soon I realised it was due to that I ran out of RAM, 2k does not last that long, specifically when every debug string you put in consumes RAM. I found out about PROGMEM but I did not find so much more information on how to use it so instead I focused on getting things to work. But now when I re-write the whole communication code I plan to do it right!
And another recommendation is to use the latest Arduino IDE, the 1.5.8 Beta. It uses much newer compiler etc as described in this post. Also when compiling it generates not only information about how much of the storage space you sketch uses but also how much RAM is used at start. Like this: Sketch uses 9,412 bytes (30%) of program storage space. Maximum is 30,720 bytes.
Global variables use 1,126 bytes (54%) of dynamic memory, leaving 922 bytes for local variables. Maximum is 2,048 bytes.
Remember that this only indicates the situation at start so do you have functions that use large arrays that will not be shown there.